following the original photo:
after digital though:
step 1:Maps Gradient layer masking for black and white ... press OK first ...blending mode option and then replace it to "Multiply" and reduce its opacity until they pleased ...

results:
step 2:Gradient Maps make a new layer once more but its blending mode NORMAL let alone ...His only opacity dikurangin ... approximately to 72% ...
Step 3:gradient maps in the first layer, use the black brush tooland rub it on the part that it was too dark ...
step 4:after that duplicate the original photo layer at the bottom that ...in his new play Burn and Dodge tools it ....so dark so taken with her bright tasty ...here takes creativity:
step 5:then the layer gradient maps to-2, use the black brush tool alsoand rub in these parts ....
Step 6:then if already press CTRL + SHIFT + Nchange the mode to OVERLAY and his check under it ....
later appearance in the column layer like this ...
Step 7:This layer of his nature is similar to burn & dodge,but its results the other ...layer overlay on it before, use the brush to 50% white color black to describe a part that you feel is too dark ...and use color 50% black brush to darken the black for the part and you feel too bright ....processing core is where this picture ....and this is where its going good 3D impression if its proper light the dark ....
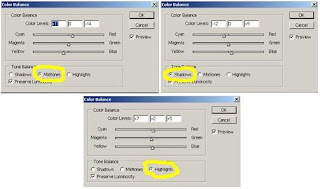
step 8:create a new Color Balance layer set up like this ...that this step was actually rather like the liver nih kok ....if want to impress her blue toning aja yah brush into the blue-tint ...if want to impress her red toning aja yah brush into red-reddish ...
step 9:new to the last step Selective Color arranged like this ....
completed, each person will produce different results depending on the imagination of the author therefore make as beautiful as possible ...
could be added if there is a shortage of friends ....
 10:26 PM
 PHOTOGRAPHY


 Posted in:


0 comments:
Post a Comment
thanks for your suggestion